配置iBatis.NET DataMapper
Wednesday, April 18, 2007
一. 在iBatis.Net的官方网站下载iBatis.NET DataMapper 1.6.1。这个是今年4月6号的最新版本,也是快一年以来的第一次更新。
下载的Release的版本解压缩以后看起来很杂乱,dll、xml和xsd等一大堆。
二. 为了能够在Visual中编写映射文件和配置文件时使用智能提示和校验,首先把provider.xsd、SqlMap.xsd和SqlMapConfig.xsd拷贝到[VS安装目录]\Xml\Schemas,这个路径是相对于VS 2005的,其他版本参看文档4.2.4节。
注:iBatis.NET的文档是需要单独下载的,不在Release包里面,下面提到的文档均是1.6.1版本的文档。
三. 使用iBatis.NET之前需要在VS的工程中添加对IBatisNet.DataMapper.dll引用,添加它的同时,它会自动将IBatisNet.Common.dll和Castle.DynamicProxy.dll添加到工程的bin目录下。
四. 编写SqlMap.config文件,并将其置于跟目录下,一般是Web.config(WEB应用程序)或者App.config(winform)所在的文件夹。下面是一个简单示例,修改自iBatis.NET文档。
1: <?xml version="1.0" encoding="utf-8"?>
2: <sqlMapConfig xmlns="http://ibatis.apache.org/dataMapper"
3: xmlns:xsi="http://www.w3.org/2001/XMLSchema-instance" >
4: <properties resource="properties.config"/>
5: <settings>6: <setting useStatementNamespaces="true"/>
7: <setting cacheModelsEnabled="true"/>
8: <setting validateSqlMap="false"/>
9: </settings> 10: 11: <database>12: <provider name="sqlServer2.0"/>
13: <dataSource name="iBatisExt" connectionString="user id=sa;password=sa;data source=10.14.91.244;database=northwind;"/>
14: </database> 15: 16: <sqlMaps>17: <sqlMap resource="${root}Maps/Categories.xml"/>
18: </sqlMaps> 19: </sqlMapConfig>其中首先指定Properties文件的位置,此处的Properties.config与SqlMap.config位于相同位置,Properties文件一般用来定义“名称-值”对,例如下面使用到的${root}就是在Properties.config中定义的,这里使用的Properties文件如下,很简单:
1: <?xml version="1.0" encoding="utf-8" ?>
2: <settings>3: <add key="root" value="./" />
4: </settings>Setting用于给定ibatis.net的一些属性,例如useStatementNamespaces是是否允许使用map文件中的命名空间,文档中的示例为false,注意把它改成true,因为下面的程序使用了map文件中的命名空间。
database用于配置映射的数据源,Provider我改成了sqlServer2.0。
五. 把定义数据源的providers.config拷贝到与SqlMap.config相同的目录下,打开providers.config,修改其中的
1: <provider2: name="sqlServer2.0"
3: enabled="false"
为
1: <provider2: name="sqlServer2.0"
3: enabled="true"
这里默认情况下,也就是从Release文件夹拷贝过来的providers.config是不打开sqlServer2.0,这个地方害我修改了半天。
六. 编写映射文件、实体类就完成了iBatis的配置。如果你不想自己编写映射文件、实体类,Go on
七. 我找到了一个iBatis.NET的CodeSmith模板,名字叫做IBatisNetGen,个人觉得很好用,它直接生成了映射文件、实体类、DAO接口和DAO层。注意在使用时制定他们的命名空间,免得生成后自己去修改。
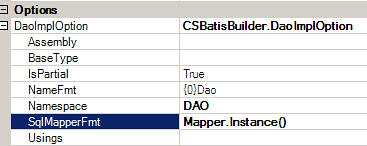
八. 使用上述模板注意有一个地方需要修改,就是在把DAO模板里面需要把SqlMapperFmt属性改为你自己的Mapper类,如本文中使用iBatis.NET默认的Mapper.Instance()。
如果使用到了多数据库,要用不同的SqlMap文件,并编写不同的Mapper类,如这里完成了一个使用AnotherSqlMap.config文件的AnotherSqlMapper类(参考文档Example 4.4),注意红色的行与iBatis.net中文档4.4.1.1节有一点区别,4.4.1.1节的语句不能直接用于替换文档中的Example 4.4的对应语句,必须做红色标示的修改。奇怪一下文档为什么不前后一致呢?
1: using IBatisNet.Common.Utilities;
2: using IBatisNet.DataMapper;
3: using IBatisNet.DataMapper.Configuration;
4: 5: namespace Demo
6: {7: public class AnotherSqlMapper
8: {9: private static volatile ISqlMapper _mapper = null;
10: 11: protected static void Configure(object obj)
12: {13: _mapper = null;
14: } 15: 16: protected static void InitMapper()
17: {18: ConfigureHandler handler = new ConfigureHandler(Configure);
19: DomSqlMapBuilder builder = new DomSqlMapBuilder();
20: _mapper = builder.ConfigureAndWatch("AnotherSqlMap.config",handler);
21: } 22: 23: public static ISqlMapper Instance()
24: {25: if (_mapper == null)
26: {27: lock (typeof(SqlMapper))
28: {29: if (_mapper == null)
30: { 31: InitMapper(); 32: } 33: } 34: }35: return _mapper;
36: } 37: 38: public static ISqlMapper Get()
39: {40: return Instance();
41: } 42: } 43: }九 配置完成,以Northwind中的Categories表为例,实体类Categories。C#获取全部记录的调用语句。
1: ICategoriesDao catDao=new CategoriesDao();
2: IList<Categories> cats = catDao.FindAll(); 3: gvCategories.DataSource = cats; 4: gvCategories.DataBind();


0 COMMENTS:
Post a Comment